목차
Turorial
| 이름 | 버전 (2019-12-04 기준) |
| Unity3d | 2018.4.13f1 (LTS) |
| Firebase Unity SDK | 6.7.0 |
| Node | 12.13.1 |
Firebase Setting
1. 아래 링크에서 새로운 Firebase 프로젝트를 만들거나 기존의 Firebase 프로젝트를 사용한다.
https://seonbicode.tistory.com/28
2. 새로운 앱을 등록하거나 기존의 앱을 사용한다.
Unity3d에서는 Unity에서 지원하는 코드리스 IAP 를 사용하여 세팅을 할 예정이고 Firebase 와의 연동은 Node.js 서버에서 한다.
Web App만 만들면 된다.
https://seonbicode.tistory.com/43#Firebase_Project_New_App_Add
3. Database 세팅을 한다. Firebase 에서 세팅을 한 적이 있다면 넘어가자.
https://seonbicode.tistory.com/43#Database
4. Hosting 세팅을 한다.
만약, Web App 세팅을 하면서 Hosting 세팅까지 같이 했다면 이번 Hosting 세팅(4번)은 넘어가도 된다.
먼저 node 와 npm 와 express 3가지를 설치한다.
https://seonbicode.tistory.com/38#Node.js_%EA%B0%9C%EB%B0%9C%ED%99%98%EA%B2%BD_%EA%B5%AC%EC%B6%95
그 후, Firebase Console 에서 Firebase Hosting 세팅을 해준다.
Firebase login, init 같은 경우 차후 서버를 제작할 때 같이 세팅해줘야 편하므로 넘어간다.
https://seonbicode.tistory.com/43#Hosting
5. Keystore 세팅만 진행하면 된다.
인앱 기능을 사용하기 위해서는 Unity3d 에서 빌드한 APK를 Google 개발자 콘솔에서 출시를 해야하기 때문에 Keystore 세팅이 필요하다.
Android App 을 만든 후 SHA 지문 세팅까지 할 필요가 없다.
https://seonbicode.tistory.com/43#SHA_%EC%9D%B8%EC%A6%9D%EC%84%9C_%EC%A7%80%EB%AC%B8
Server
영수증 데이터를 저장하기 위해 일단 Firebase Cloud Firestore 에 대해 알아야하니
먼저 https://seonbicode.tistory.com/47#Firebase_Cloud_Store_%EA%B5%AC%EC%A1%B0 이 링크에서 Cloud Store의 구조에 대해 알아보자.
그리고 서버로써 구동해줄 새로운 Firebase Hosting Project 를 만들거나 기존의 Firebase Hosting Project 를 이용해야한다.
만약 기존에 사용하던 Firebase Hosting Project 가 없다면 아래 링크를 참고하여 새롭게 만들어줘야한다.
이 글은 새로운 Firebase Hosting Project 를 기준으로 진행한다.
아래에 첨부된 db_iap.js 파일을 main.js 로 이름을 변경하여 기본 Hosting Project 에 있는 main.js에 붙여넣어도 되고 index.js 에 새로운 미들웨어로 선언해도 된다.
새로운 미들웨어로 선언하고자 하면 Firebase Hosting Project 의 functions 폴더에 넣어주면 된다.
// express 프레임워크
const express = require('express');
const router = express.Router();

// firebase Admin 써드파티 미들웨어
const admin = require('firebase-admin');
// firebase Admin 초기화
const firebaseAdmin = admin.initializeApp({
    credential: admin.credential.cert({
        // firebase admin sdk json 에 있는 키값들을 넣어준다.
    }),
    databaseURL:
    storageBucket:
});

// 클라이언트가 보낸 영수증을 받은 후 DB에 저장한다.
router.post('/postReceiptSave', (req, res) => {
    const work = async () => {
        try{
            // 클라이언트에서 보낸 json 데이터
            var receiptData = req.body;

            console.log(receiptData.transaction_id);

            // firestore 에서의 collection은 단순히 문서의 컨테이너이다.
            // db에 'receipt'라는 컬렉션이 없으면 자동으로 생성 후 사용하며
            // 있다면 그대로 사용한다.
            firebaseAdmin.firestore().collection('receipt')
            // doc() 이면 firestore가 자동으로 id로 문서가 생성한다.
            // doc('임의의 이름') 이면 사용자가 지정한 이름으로 문서가 생성된다.
            .doc(receiptData.transaction_id)
            // JSON 데이터를 직접 넣는다.
            .set(receiptData)
            .then(() => {
                // 데이터 입력 성공 시...
                return res.send(true);
            }, (err) => {
                // 데이터 입력 실패 시...
                throw err;
            });
        } catch(err) {
            console.log(err);

            return res.send(false);
        }
    }

    work();
});

// 클라이언트가 보낸 영수증 이름으로 DB에서 검색 후 클라이언트에 JSON 되돌려준다.
router.get('/getSearchData', (req, res) => {
    const work = async () => {
        try{
            var id = req.query.transaction_id;

            // 문서 한 개만 찾은 후 클라로 보낸다.
            firebaseAdmin.firestore().collection('receipt').doc(id).get()
            .then((snapshot) => {
                // 찾은 문서에서 데이터를 JSON 형식으로 얻는다.
                var receiptData = snapshot.data();

                return res.json(receiptData);
            }, (err) => {
                throw err;
            });

            // 만약
        } catch(err) {
            console.log(err);

            return res.send(false);
        }
    }

    work();
});

module.exports = router;
기본 main.js에 붙여넣지 않고 따로 index.js 에 위에 다운로드 받은 db_iap를 새로운 미들웨어로 추가하는 방법이다.
functions/index.js
// 다른 미들웨어들 선언
...
...
const functions = require('firebase-functions');

// 다른 미들웨어들 선언 위치 아래에 선언하면 된다.
// js 파일을 불러온다. db_iap.js 를 불러온다.
var dbRouter = require('./db_iap');

// app 선언
var app = express();

// app 선언 이후에 입력
// /db 라는 신호가 들어오면 dbRouter 로 넘겨준다.
app.use('/db', dbRouter);
db_iap.js 에 비어있는 Firebase Admin SDK JSON 은 아래 링크에서 구한 후 initializeApp 을 채워준다.
https://seonbicode.tistory.com/43#_Firebase_Admin_SDK
이 서버의 경우 Unity(클라이언트)가 보낸 결제 영수증을 Firebase Firestore에 저장하는 역할을 한다.
Firebase Admin 키 값까지 넣었다면 터미널에서 firebase serve 명령어를 firebase hosting 프로젝트 폴더/functions 폴더에서 실행시켜 서버가 잘 실행되는지 테스트 한다.

서버가 잘 열린다면 서버와 통신하여 인앱 결제를 진행할 Unity3d 클라이언트를 제작한다.
Client
Unity3d 에서는 인앱 결제를 위한 세팅을 해줘야한다.
아래 링크를 참고하여 기본적인 Unity3d Client Setting을 한다.
https://seonbicode.tistory.com/43#Unity3d_Client_Setting
Unity3d 코드리스 IAP(Unity IAP) 의 경우 Firebase 기능을 사용하지 않고 결제를 진행하기 때문에 클라이언트에서 Firebase 에 관련된 세팅을 하지 않아도 된다. SDK도 Firebase 에서 다운로드 받는 google-services.json도 필요 없다.
먼저 구글 개발자 콘솔 세팅부터 해서 라이선스 키를 얻어준다.
구글 개발자 계정이 아직 없다면 구글 개발자 계정을 만들어준다. (구글 개발자 계정 등록은 유료이며 한번만 결제를 진행하면 된다.)
Google Play Console 에 접속한 후 새로운 애플리케이션을 만든다.

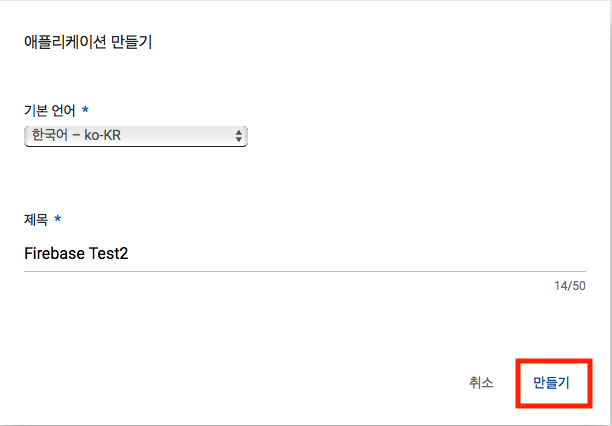
다른 설정은 이따가 작성하도록 하고 서비스 및 API - 라이선스 및 인앱 결제 - 라이선스 키 복사를 해둔다.
이 라이선스 키는 조금 있다 Unity IAP 설정을 할때 필요하다.

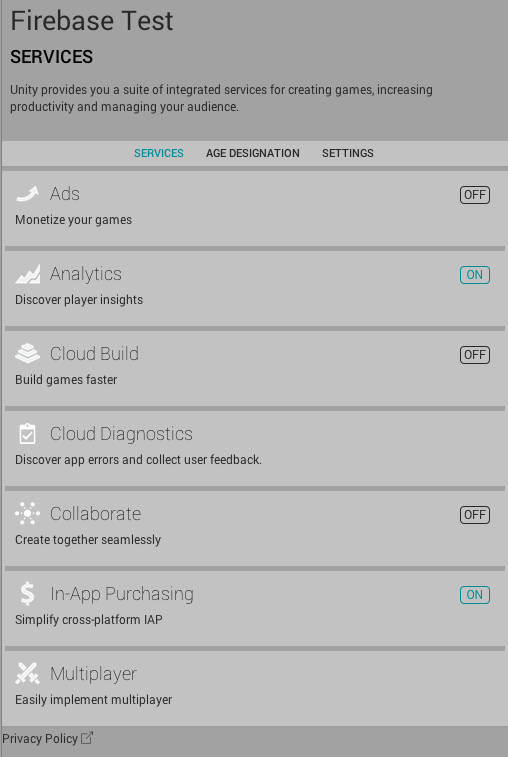
다시 Unity3d 프로젝트로 돌아온 후 Window - General - Services 를 연다.
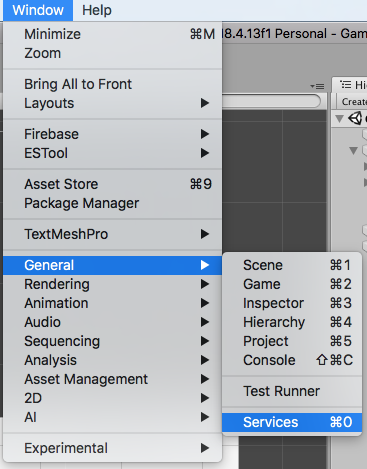
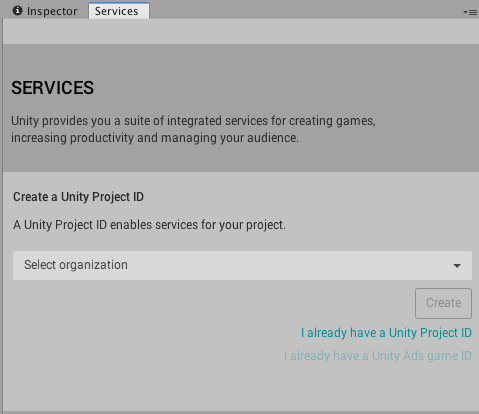
Unity IAP 를 사용하는 모든 프로젝트에는 Unity Services 의 프로젝트 ID가 필요하다.
프로젝트 ID 가 없는 경우 ID를 만들어야한다. 먼저 Select Organization 드롭 다운 메뉴를 눌러 Organization(조직) 을 선택한다.
여기서 Organization은 Unity User 또는 그룹 일 수 있다. 기본 Organization은 로그인한 Unity 계정으로 설정된다. Organization이 설정되면 Create버튼을 클릭하여 프로젝트 ID를 생성한다.
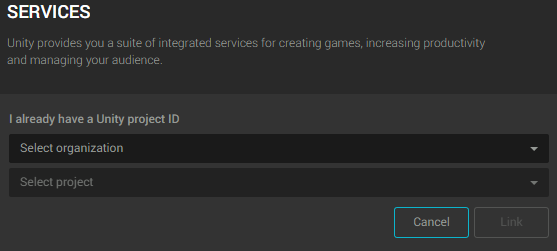
만약 프로젝트의 Unity 프로젝트 ID를 이미 생성한 경우 'I already have a Unity Project ID' 를 선택하면 된다.
이미 프로젝트 ID가 있는 경우 Organization을 선택하면 이전에 생성 된 프로젝트 ID 목록에서 선택할 수 있다.
Select Organization 드롭 다운을 클릭하여 기존 프로젝트 ID를 선택하자.
In-App Purchasing 을 눌러 IAP 활성화 화면으로 넘어간다.

Enable 버튼을 눌러 기능 사용 가능하게 합니다.

COPPA 어린이 온라인 개인 정보 보호법은 13세 미만 어린이의 온라인 개인 정보 수집에 적용된다. 만약 13세 미만 대상으로 하는 게임이라면 체크를 해줘야한다.
13세 이상 게임이라면 체크를 하지말고 Continue 를 눌러준다.
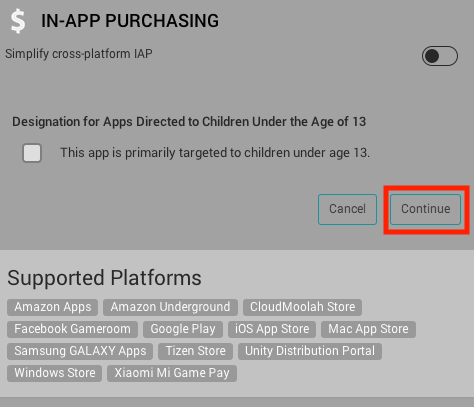
import 버튼을 눌러 Unity IAP 패키지를 추가한다. (import 후 사진을 찍어 Reimport로 나온다..)

전부 import 한다. 진행하던 도중 API Update Required 창이 뜨면 I Made a Backup. Go Ahead! 를 누른다.

패키지를 가져온 후 Plugins 라는 폴더가 새로 생기고 그 폴더 안에 Unity IAP를 사용하는데 필요한 UnityPurchasing Assets이 포함된 것을 알 수 있다.
Unity IAP 를 활성화 하면 Analytics 도 같이 활성화 되는데 이 Analytics는 Firebase의 Analytics가 아니라 Unity3d에서 지원하는 Analytics이다.
window - Unity IAP - Receipt Validation Obfuscator 누른다.

파란색 상자 위치에 위에서 복사한 구글 라이선스 키를 넣어준다. (1.23.1 버전 기준 Project Secret Key을 입력하는 칸이 사라졌다. 입력하지 않아도 작동은 잘 된다.)
빨간색 상자 버튼을 눌러 키 난독화를 적용하고
초록색 상자 를 눌러 Analytics Dashboard에 접속한다.

Google License Key 상자 안에 위에서 붙여넣은 구글 라이센스 키를 붙여넣은 후 저장을 한다.

다시 Unity3d로 돌아와 아래의 칸에 다시 구글 라이센스 키를 붙여넣은 후 Verify 누른다.

만약 아래와 같이 Update 버튼이 안 나타나고 오류가 발생한다면 Receipt Validation Obfuscator 를 눌러 창을 열어서 다시 순서대로 세팅 해준다.

인앱 결제를 진행할 스크립트를 하나 만든다.
using System.Collections;
using System.Collections.Generic;
using UnityEngine;

using UnityEngine.Purchasing;
using UnityEngine.Purchasing.Extension;
using UnityEngine.Purchasing.Security;
using UnityEngine.Analytics;
using UnityEngine.UI;
using System.Threading.Tasks;
using UnityEngine.Networking;
using System;

public class IAPManager : MonoBehaviour, IStoreListener
{
    // 영수증
    public class Receipt
    {
        public string index;
        public string uid;
        public string transaction_id;
        public string product_id;
        public string platform;
        public string price;
        public string date;
    }

    static IStoreController storeController = null;

    // 코인을 보여줄 UGUI Text
    [SerializeField] Text txtCoin;
    int nCoin;

    // 로그를 보여줄 UGUI Text
    [SerializeField] Text txtLog;

    public bool isPurchaseUnderProcess = true;

    // 결재 품목 목록
    static string[] sProductlds;

    private void Awake()
    {
        if (storeController == null)
        {
            // 인앱상품 - 관리되는 제품의 ID
            // 인앱상품을 추가시 여기에 새로 추가하면 된다.
            sProductlds = new string[] { "coin_1000", "coin_5000" };
            InitStore();
        }
        nCoin = 0;
    }

    private void Start()
    {
        // 결제 복구 로직
        // 빠른 테스트를 위해 Start() 에서 실행한다.
#if UNITY_ANDROID && !UNITY_EDITOR
        ReleaseAllUnfinishedUnityIAPTransactions();
#endif
    }


    // 결제 상품 초기화
    void InitStore()
    {
        ConfigurationBuilder builder = ConfigurationBuilder.Instance(StandardPurchasingModule.Instance());
        builder.AddProduct(sProductlds[0], ProductType.Consumable, new IDs { { sProductlds[0], GooglePlay.Name } });
        builder.AddProduct(sProductlds[1], ProductType.Consumable, new IDs { { sProductlds[1], GooglePlay.Name } });

        // 초기화
        UnityPurchasing.Initialize(this, builder);
    }

    // 초기화 완료시...
    void IStoreListener.OnInitialized(IStoreController controller, IExtensionProvider extensions)
    {
        storeController = controller;
        txtLog.text = "결제 기능 초기화 완료";
        Debug.Log(txtLog.text);
    }

    // 초기화 실패시...
    void IStoreListener.OnInitializeFailed(InitializationFailureReason error)
    {
        txtLog.text = "OnlnitializeFailed " + error;
        Debug.Log(txtLog.text);
    }

    // 인앱 상품 결제를 눌렀을 경우...
    // 상품 버튼을 만들어 사용하면 된다.
    public void OnBtnPurchaseClicked(int index)
    {
        if (storeController == null)
        {
            txtLog.text = "구매 실패 : 결제 기능 초기화 실패";
            Debug.Log(txtLog.text);
        }
        else
            storeController.InitiatePurchase(sProductlds[index]);
    }

    // 결제 진행...
    PurchaseProcessingResult IStoreListener.ProcessPurchase(PurchaseEventArgs e)
    {
        bool isSuccess = true;

        // 에디터에서는 작동하지 않는다.
#if UNITY_ANDROID && !UNITY_EDITOR

        CrossPlatformValidator validator = new CrossPlatformValidator(GooglePlayTangle.Data(), AppleTangle.Data(), Application.identifier);

        try
        {
            // 클라이언트 영수증 검산
            IPurchaseReceipt[] result = validator.Validate(e.purchasedProduct.receipt);

            // 클라이언트 검산 후 클라이언트 검산 데이터를 등록한다.
            foreach(var productReceipt in result)
            {
                // https://docs.unity3d.com/kr/530/ScriptReference/Analytics.Analytics.Transaction.html
                Analytics.Transaction(productReceipt.productID, e.purchasedProduct.metadata.localizedPrice, e.purchasedProduct.metadata.isoCurrencyCode, productReceipt.transactionID, null);

                // 영수증을 서버에 저장한다.
                ReceiptSave(JsonUtility.ToJson(CreateReceipt(productReceipt, e.purchasedProduct.metadata.localizedPrice.ToString())));

                // OS 별로 특정 세부 사항이 있다
                // https://docs.huihoo.com/unity/5.4/Documentation/en/Manual/UnityIAPValidatingReceipts.html
                //var google = productReceipt as GooglePlayReceipt;
                //var apple = productReceipt as AppleInAppPurchaseReceipt;
            }
        }
        catch (IAPSecurityException)
        {
            isSuccess = false;
        }
#endif

        // 복구 테스트
        if (!isPurchaseUnderProcess)
        {
            Debug.Log("pending Test");
            txtLog.text = "구매 복구 테스트 시작";

            // 강제 결제 복수 테스트를 위해 무조건 결제가 완료가 안되게 한다.
            return PurchaseProcessingResult.Pending;
        }
        else
        {
            // 정상 결제 서버로직
            if (isSuccess)
            {
                if (e.purchasedProduct.definition.id.Equals(sProductlds[0]))
                {
                    AddCoin(1000);
                }
                else if (e.purchasedProduct.definition.id.Equals(sProductlds[1]))
                {
                    AddCoin(5000);
                }
            }
            else
            {
                txtLog.text = "구매 실패 : 비정상 결제";
                Debug.Log(txtLog.text);
            }

            // 결제 완료
            return PurchaseProcessingResult.Complete;
        }
    }

    // 구매 진행 도중 실패 시 진입...
    void IStoreListener.OnPurchaseFailed(Product i, PurchaseFailureReason p)
    {
        if (!p.Equals(PurchaseFailureReason.UserCancelled))
        {
            txtLog.text = "구매 실패 : " + p;
            Debug.Log(txtLog.text);
        }
    }

    // 서버에 보낼 영수증 데이터를 가공
    public Receipt CreateReceipt(IPurchaseReceipt rec, string price)
    {
        var userReceipt = new Receipt();

        // firebase uid를 입력해주거나 각 유저의 고유 ID를 입력한다.
        userReceipt.uid = "AAAAAAAAAAAAAAA";
        userReceipt.transaction_id = rec.transactionID;
        userReceipt.product_id = rec.productID;
        userReceipt.platform = SystemInfo.operatingSystem;
        userReceipt.price = price;
        userReceipt.date = rec.purchaseDate.ToString("yyyy/MM/dd HH:mm:ss");

        return userReceipt;
    }

    // 구매 복구
    // 모든 인앱 상품들에게 너 지금 Pending 상태 인지 물어본다. 만약 pending 상태인 상품이 있다면 다시 결재를 진행한다.
    // 편안한 테스트를 위해 버튼으로 작동하게 한다.
    public void ReleaseAllUnfinishedUnityIAPTransactions()
    {
        foreach (string productId in sProductlds)
        {
            Product p = storeController.products.WithID(productId);

            isPurchaseUnderProcess = true;

            if (p != null)
                storeController.ConfirmPendingPurchase(p);
        }
    }

    // 결제 로직에서 무조건 Peding 으로 가게 설정
    // 버튼이나 어떠한 로직에서 실행시켜주면 된다.
    public void Pending()
    {
        isPurchaseUnderProcess = !isPurchaseUnderProcess;
        Debug.Log("Pending: " + !isPurchaseUnderProcess);
        txtCoin.text = "Pending: " + !isPurchaseUnderProcess;
    }

    // 클라이언트 코인 지급을 처리한다.
    void AddCoin(int value)
    {
        txtLog.text = "AddCoin : " + value;
        Debug.Log(txtLog.text);
        nCoin += value;
        txtCoin.text = "Coin : " + nCoin.ToString("NO");
    }

    //////////////////////////////////
    // 서버에 영수증을 보내 DB에 저장한다. //
    /////////////////////////////////
    public void ReceiptSave(string json)
    {
        try
        {
            StartCoroutine(JsonDBSavePost("http://localhost:5000/db_iap/userReceiptSave", json));
        }
        catch (Exception err)
        {
            Debug.LogError(err);
        }
    }
    private IEnumerator JsonDBSavePost(string url, string json)
    {
        using (var uwr = new UnityWebRequest(url, "POST"))
        {
            Debug.Log(json);

            byte[] jsonToSend = new System.Text.UTF8Encoding().GetBytes(json);
            uwr.uploadHandler = (UploadHandler)new UploadHandlerRaw(jsonToSend);
            uwr.downloadHandler = (DownloadHandler)new DownloadHandlerBuffer();
            uwr.SetRequestHeader("Content-Type", "application/json");

            yield return uwr.SendWebRequest();

            if (uwr.isNetworkError)
            {
                Debug.Log("Error While Sending: " + uwr.error);
            }
            else
            {
                Debug.LogFormat("Received: ({0}) {1}", url, uwr.downloadHandler.text);

                var receiptSave = bool.Parse(uwr.downloadHandler.text);

                Debug.Log(receiptSave);
            }
        }
    }

    ////////////////////////////////////////////////////////////
    // 영수증 ID 로 서버 DB에 저장된 영수증 데이ㅌ를 가지고 온다.         //
    ///////////////////////////////////////////////////////////
    public void GetReceiptDataDB(string id)
    {
        try
        {
            StartCoroutine(UserDataGet("http://localhost:5000/db_iap/getSearchData?uid=", id));
        }
        catch (Exception err)
        {
            Debug.Log(err);
        }
    }
    private IEnumerator UserDataGet(string url, string id)
    {
        // UnityWebRequest 를 이용하여 웹 서버에 접속한다.
        using (UnityWebRequest www = UnityWebRequest.Get(url + id))
        {
            yield return www.SendWebRequest();

            if (www.isNetworkError)
            {
                Debug.Log("Error While Sending: " + www.error);
            }
            else
            {
                Debug.LogFormat("Received: ({0}) {1}", url, www.downloadHandler.text);

                // 서버가 보낸 JSON를 user클래스로 파싱한다.
                var receipt = JsonUtility.FromJson<Receipt>(www.downloadHandler.text);

                Debug.Log("구매한 물건의 가격은: " + receipt.price);
            }
        }
    }
}
유니티(클라이언트)는 Unity IAP 를 이용하여 결제를 진행하고 영수증을 서버에 보내준다. 서버는 Firebase 와 통신하여 클라이언트가 보낸 영수증 정보를 저장한다.
영수증 검산을 통과한 결제 정보의 영수증을 받아와 서버에 전송해준다.
에디터에서의 인앱결제는 무조건 성공하기 때문에 정확한 테스트를 위해서는 APK 빌드 이후 테스트 해야한다.
APK 빌드를 하기전에 /Assets/Plugins/Android/Firebase 에 위치한 AndroidManifest.xml 을 수정해줘야한다.
파일을 연 후 <uses-permission android:name="com.android.vending.BILLING"/> 을 추가하여 권한을 준다.

AndroidManifest 까지 수정 하였다면 Android APK 를 뽑아주자.
뽑은 APK 를 구글 개발자 콘솔에서 내부 테스트 트랙으로 출시를 해야한다.
어떤 형태로든 출시를 해야 안드로이드 앱에서 정확한 인앱결제 테스트를 해볼 수 있다.
다시 구글 플레이 개발자 콘솔로 돌아간다.
앱 버전 - 내부 테스트 - 관리 클릭


아까 빌드한 APK 파일을 드래그하여 넣는다.
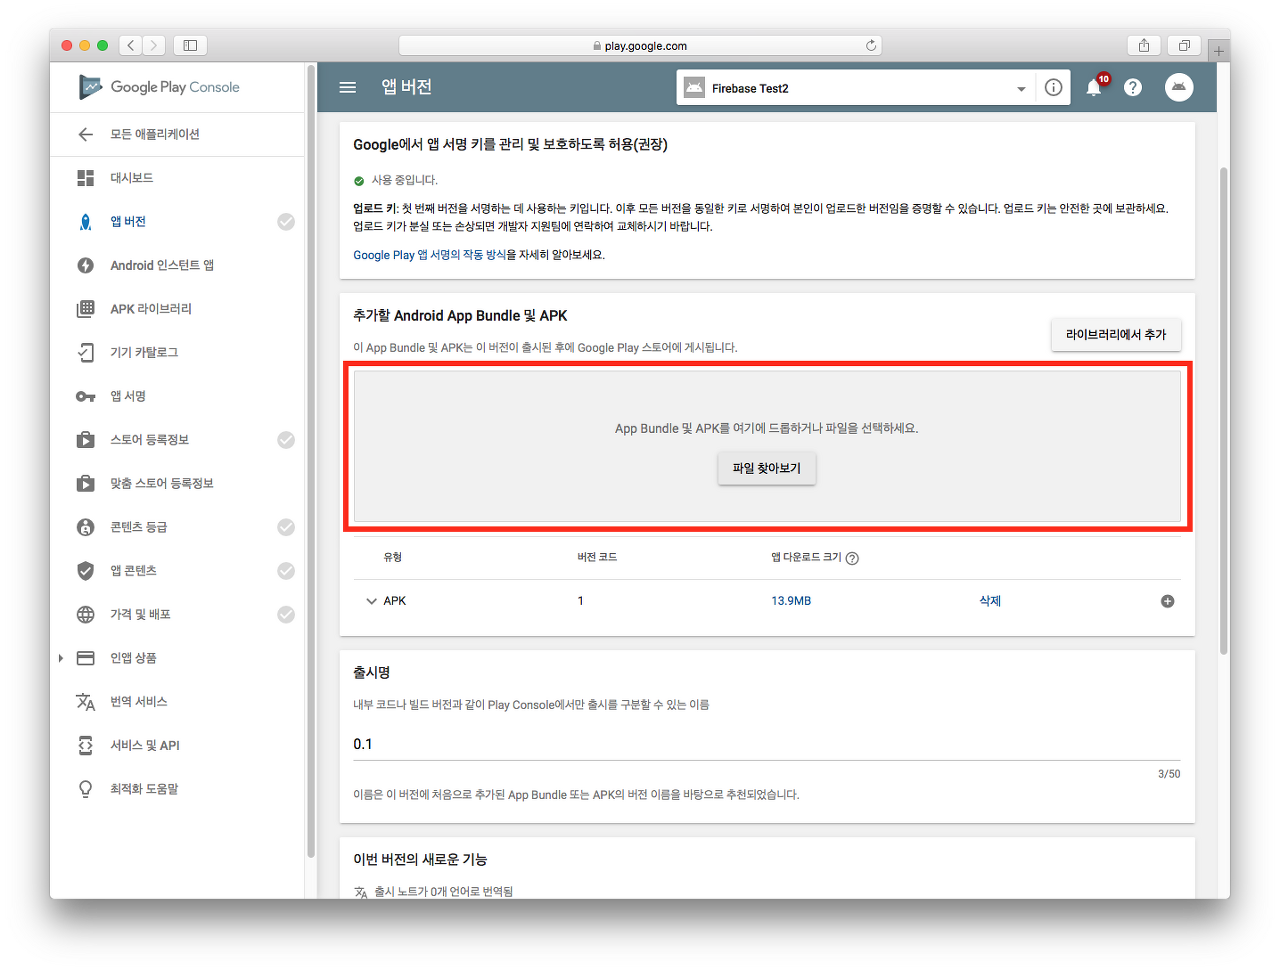
저장 클릭. 체크 표시를 모두 채운 후 다시 돌아와 검토 버튼을 눌러야한다.

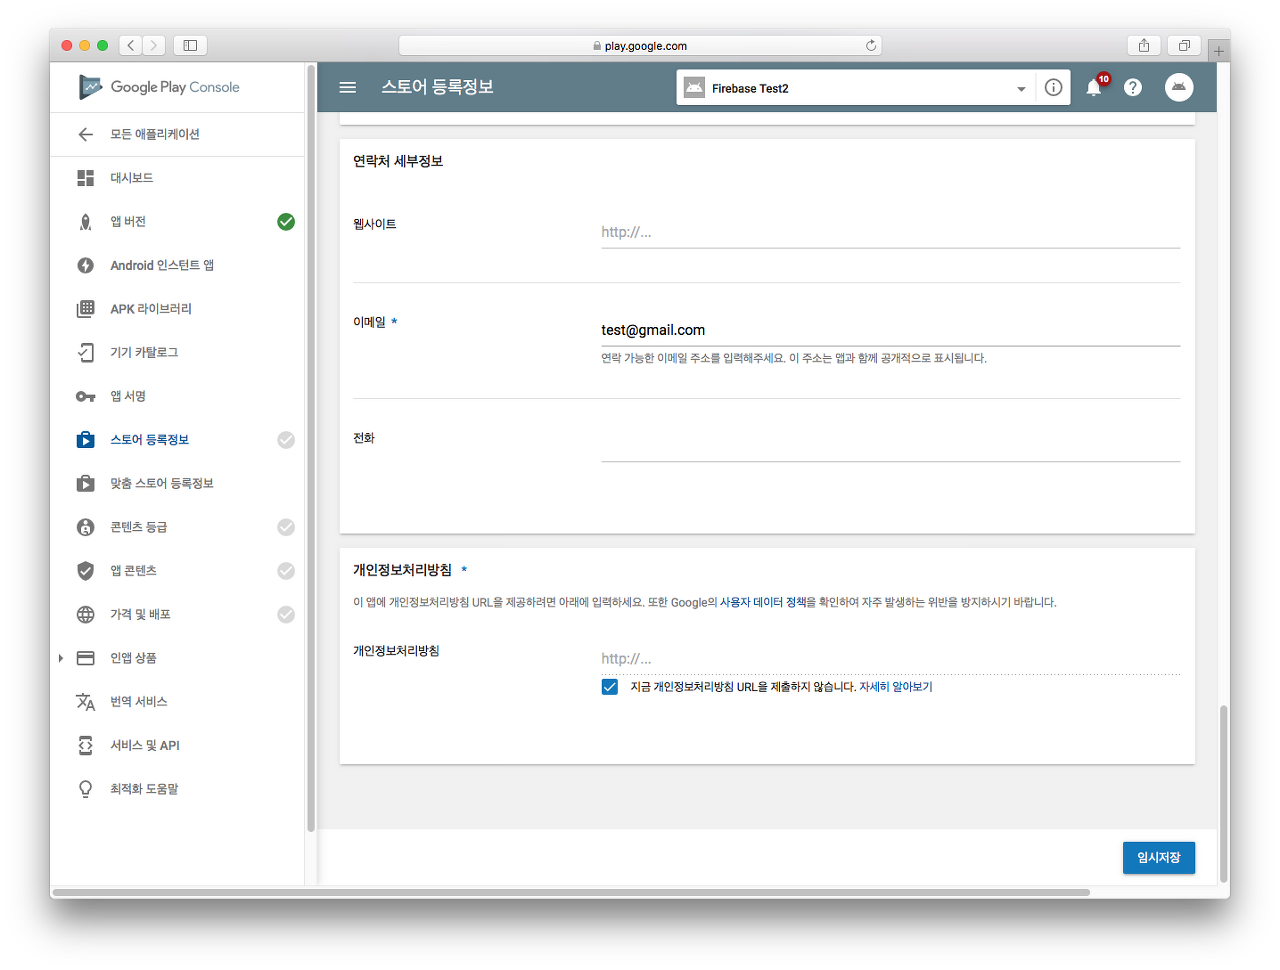
스토어 등록정보를 대충 입력해준다.

스토어 이미지를 등록해준다. 첨부 파일을 이용하여 채워넣자. 게임 스크린샷의 경우 최소 2장을 넣어줘야한다. 같은 이미지를 넣어줘도 상관없다.

카테고리와 이메일, 개인 정보 처리 방침 등 채워야하는 부분을 임의로 채운 후 임시 저장을 눌러준다.
컨텐츠 등급의 경우 차후 설정하면 된다.

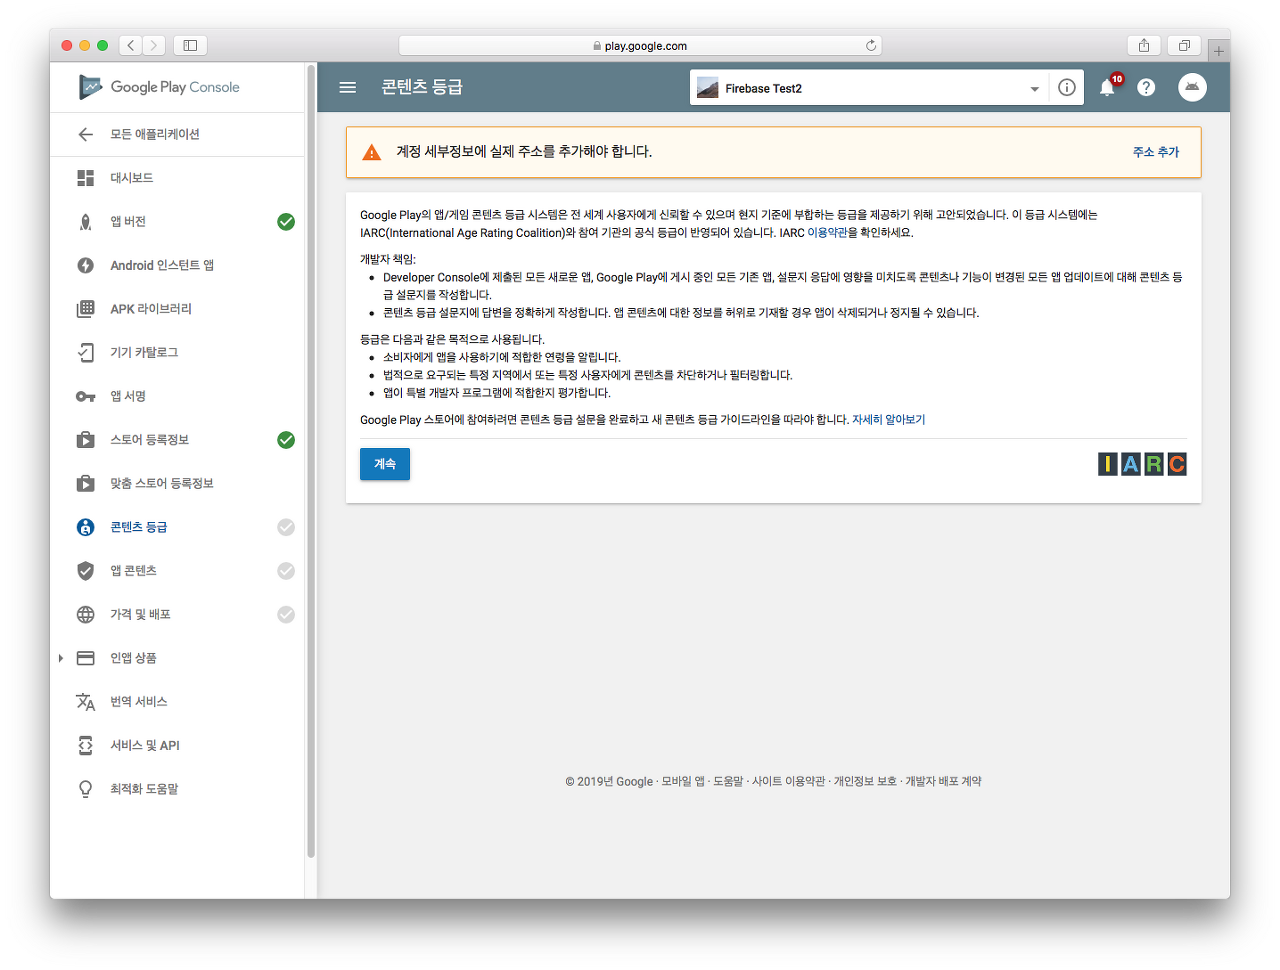
콘텐츠 등급을 설정해준다.
이메일를 입력 후 전체이용가 게임의 경우 쭈욱 아니오를 체크하고 등급을 받고 아닐 경우 문항 하나하나를 읽은 후 자신이 해당하는 부분을 체크하며 넘어가자.
가격 및 배포는 배포 방법은 무료, 모든 국가를 사용가능으로 설정, 광고 미포함, 콘텐츠 가이드 체크, 미국 수출 법규 체크 후 저장한다.

앱 콘텐츠는 시작을 누른 후 대상 연령층 선택 후 아이들 관심 유도 아니오 선택 후 제출을 한다.

모든 체크 표시를 채우고 다시 앱버전으로 돌아가 관리를 눌러준다.

검토가 활성화되었는지 확인한다.
만약 검토가 아래처럼 활성화되어있지 않다면 왼쪽 메뉴에 비어있는 체크표시가 있다는 뜻이니 체크 표시가 안된 설정을 해준다.

검토가 활성화 되어있다면 검토 버튼을 눌러 출시를 한다.
첫 출시(출시대기 -> 출시됨)는 시간이 좀 걸린다. 하루 정도 걸린다고 생각하고 있으면 편하다.
기다리는 동안 인앱 상품 세팅을 하자.
인앱 상품 - 관리되는 제품 으로 들어간다.
coin_1000 과 coin_5000 2개의 인앱 상품을 만들면 된다.

관리되는 제품 만들기 클릭

coin_1000 과 coin_5000 을 만들어준다.

가격을 입력 후 적용 후 저장까지 클릭한다.

추가하고자 하는 상품을 모두 추가하면 앱이 출시가 완료될때까지 기다리면된다.
출시가 되지 않은 상태에서는 인앱 상품 목록을 받지 못하기 때문에 출시가 완료된 후 테스트를 할 수 있다.
에디터에서 진행하는 인앱 결제 테스트는 페이크 결제로 항상 성공한다.
출시 후 처음부터 끝까지 테스트를 하면 아래와 같은 결과값이 나온다.
Connect
Unity3d 구성까지 끝냈다면 세팅한 서버를 터미널에서 firebase deploy 명령어를 Firebase Hosting 에 배포를 하면 로컬 네트워크가 아닌 안드로이드앱에서도 테스트가 가능해진다.
도메인 url를 Unity3d의 db_iap.cs 에 있는 localhost:5000 주소 대신 입력해주면 된다.
결제를 진행했을때 아래와 같이 영수증을 Server가 Firebase DB에 저장을 하면 완료인것이다.

만약 안드로이드 앱에서 결제 초기화 실패가 발생할 경우 아직 구글 개발자 콘솔에 등록한 앱이 출시가 안된 것이다.
아래 링크의 14번에 호스팅에 대해 적혀있으니 참고하여 배포하자.
'Programming > Firebase' 카테고리의 다른 글
| [Firebase] 서버에서 운영툴 만들기 (0) | 2019.12.23 |
|---|---|
| [Firebase] 서버에서 Database 사용하기 (0) | 2019.12.17 |
| [Firebase] Unity3d 유저 인증 (0) | 2019.12.17 |
| [Firebase] Firebase 기본 설정 (0) | 2019.12.17 |
| [Firebase] Push (Cloud Messaging) 사용하기 (0) | 2019.12.13 |


최근댓글